Showing posts with label Paper Crafts. Show all posts

Monday, August 15, 2011

Back to School Studio 5


Are you all ready for Back to School. Some would say they are and some not. I am not quite sure because my daughter will just start kindergarten. I'm a little nervous about it.

Here are some great ideas for you to do for those back to school days.

These ideas were inspired all by the apple centerpiece that I saw on Shindig parties to go. I love that blog. They have been changed so that they are now my own design.
This is a simple scrapbook that was one piece of patterned paper from Adornit. I cut card-stock 6 x 6 and then cut the patterned paper into squares and placed them on corners. Each page will fit a school photo for each year.
Note Cards: who doesn't need note cards especially a cute gift for your new teacher.

Placemat will be perfect for every morning to help entice the kids to get all things done they need to before they leave for school. Dry erase so you can keep using it and using again.

Marshmallow apples: I took a large marshmallow and placed it on a skewer and dip it in chocolate. Then placed a piece of pretzel and airhead leaf on top.

This is also a great gift for those teachers every once in awhile they need a little boost.

Instructions for the Pencil Vase Centerpiece
Step 1: Gather your supplies: - Canned food with a pop top (or a can cut with a safety edge can opener) - Florist foam or styrofoam - 2 boxes of pencils - Scissors and hot glue
- Strip of paper that you like
- Apple sticker for center of medalion
Step 2:
- Empty out the contents of your canned food and save for another use. Wash and dry out the can and place a small piece of florist foam inside.
Step 3:
- Using a hot glue gun, place glue in a vertical line from the bottom to the top of your can and press one pencil into the glue, holding until the glue dries. Be sure not to skimp on the glue - you'll want your pencils to stay put.
Step 4:
- Repeat step 3 over and over again with more pencils until you've completely covered the can.
Step 5:
- Cut a strip of your printed green paper into a "ribbon" to wrap around the pencils on your can. Fit it around the center of the pencils and hot glue in place.
Step 6:
- Make circle on white card-stock and place apple sticker on it. Then mat is with green and black card-stock then clip edges and separate from each other back and forth.
CHOCOLATE COVERED OREO APPLE POPS
What you'll need:
- Wilton Shaped Party cellophane bags (I bought mine at Walmart)
- Red candy melts
- Wooden skewers
- Double Stuff Oreos
- Green Air Heads candy
- Stick pretzels
- Sharp Knife
- Shredded red tissue paper
- Pencil vase or another simple vase to hold your apple pops
Step 1: Melt your chocolate in a double boiler following the instructions on the candy melts bag. Freeze Oreo cookies in freezer for an hour. Then place skewer in Oreo and dip in chocolate.
Step 2: Place a small piece of pretzel stick with a little melted chocolate on it as well. This will help the pretzel stay in place.
Step 3: Then with the green airhead shape a leaf and dip in a little chocolate and stick it by the pretzel.
Step 4: Cover with sucker bag twist on tie. Then stick in floral foam in vase.
Step 5: Place your shredded tissue paper in-between the apple pops.

Cute little gift that was a mini Oreo dipped in chocolate and then placed a piece of pretzel and airhead leaf on top. Then placed a cute little tag on top.

These are the same little apples I made up above. I placed them in a snack bag and placed a topper on top as a cute thank you.

I hope you loved them.  I sure did and can't wait to make them for the new teacher my daughter will have.  Wahoo!!

Tuesday, August 2, 2011

Paper Bag Flowers

Here are the cutest flowers to make and easiest also.  You will love them.  I tried them and I promise you have to try also.
  • View Image
    Introduction With a few snips and folds, and a little imagination, you can turn humble paper bags into party-perfect decorations.
    You can use gusseted bags of any size for these hanging flowers; each flower is made from six bags.
  • View Image
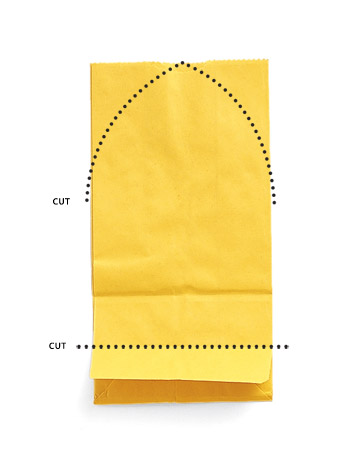
    Step 1 Fold the bottom of a bag in on itself. Cut above the lower fold, removing the bag's bottom. Trim the top into a petal shape.
  • View Image
    Step 2 Punch a hole about 1/4 inch from the bottom. Repeat process with five more bags. Apply double-sided tape to the front edges of a bag. Place another bag on top, and repeat to stack all of the bags. Draw a length of string through the hole in the stack; knot it loosely.
  • View Image
    Step 3 Pull the top and bottom bags around to form a flower shape and join the end petals with double-sided tape.
  • View Image
    Step 4 Suspend your completed paper bag flowers by string.

Thursday, June 30, 2011

4th of July Banners

 Fourth of July was around the corner and I think we all get caught up in June and forget that the 4th is right there.  So I made these banners to go along with the holiday.  I am not very good and doing tutorials step by step instructions but I can sure tell you have I made it.
 I started out with some denim I had bought on clearance a while ago probably for skirts or something.  But it was perfect for my banner.  I cut a flag from an 8 1/2 x 11 piece of paper.  Then cut out 7 pendents sewed around them and frayed the edges.  I then cut burlap the size I wanted and frayed the edges.  Then cut a pieces for the bunting a strip of red and accordion folded it and stapled one side.  The white sun shape I cut from chipboard and covered them with white fabric.  Cut out letter on glitter fun foam on my Cricut and glued everything together.  I sewed all the pendants on to ribbon and tied extra fabric pieces and ribbons in between.  It turned out awesome and I can keep it for every year.
The next banner I made was out of paper.  I cut a whole bunch of triangles out of patterned or solid red, white and blue paper.  Then took ribbon and just sewed them all together.  I was really easy and you could make it as long as you want or needed to.
Have a Great 4th of July everyone!!

Sunday, June 5, 2011

Studio 5 with i-rock


Our segment on Studio 5 is all about the i-rock tool by Imaginsce.
I had fun using this tool and learning how it works.

You can see here that we made many project with this tool. It is very versatile and can be used on multiple mediums. Will explain more of some of the projects below.

Father's Day Gift
Wouldn't any Dad love this gift. I was fun to make and was pretty easy also.
You can download the kiss coupon here:
Print it out on any paper that you would like and sign it. The paper we used was from Adorn it. Also print out the tag and sign.  Father's Day

This banner was made from SEI paper. I loved how this turned out. I also made a Spring one and have used it but needed a Summer one also. The paper fans are made out of old book pagesaccordion folded and stapled together.

These are refurbished pillows that were purchased for really cheap and recovered. I then i-rocked them and added bling that it needed.

The lamp was also redone. I spray painted it white and then covered the shade in pink and add the bling with the i-rock.

I had this star and it was metallic blue a little overwhelming so I deco-podged paper on to it and add of course the needed bling for the 4th of July.

This baby set onesie and burp clothe are a perfect gift and easy to make. Get a onesie and find a template you like and then i-rock away. The burp cloth is made out of a cloth diaper and added material to the center and added the sparkle.


We hope you enjoyed this segment and would love to see you in the store. We have the products there at the Book Table and are ready to assist you with any questions.
i-rock to your hearts desire.

Monday, April 18, 2011

Studio 5


Here are a few more items that were not shown on the show (p.s. Candiss forgot them.  That is why I made them.) But here they are for you to see.
 This bracelet was made so that you could interchange flowers with others.
 I added the metal to the page so you can see how much it adds to your scrapbooking also very versatile.
 This bracelet slips on your had and the charms jingle.  Loved the look of this.
 I also embossed the paper with the templates and then sanded it.  Also placed some pieces of metal to add some bling.
This necklace was also created so that you could exchange the pendants out and flowers to make it match whatever outfit you needed.  (This necklace has already been sold.  Crazy!)